Chapter .19-2 NIO 기반 입출력 및 네트워킹 (파일 채널)
19.4 파일 채널
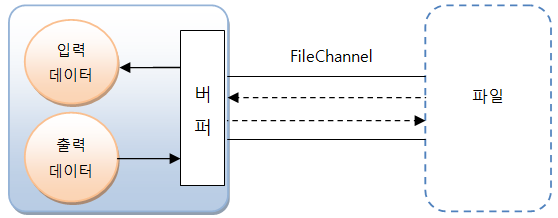
java.nio.channels.FileChannel을 이용하면 파일 읽기와 쓰기를 할 수 있다.
FileChannel은 동기화 처리가 되있기 때문에 멀티 스레드 환경에서 사용해도 안전하다.
19.4.1 FileChannel 생성과 닫기
FileChannel은 정적 메소드인 open()을 호출해서 얻을 수도 있지만, IO의 FileInputStream, FileOutputStream의 getChannel() 메소드를 호출해서 얻을 수도 있다.
다음은 open() 메소드로 FileChannel을 얻는 방법을 보여준다.
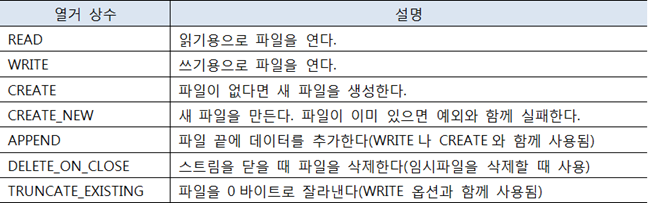
FileChannel fileChannel = FileChannel.open(Path path, OpenOption... options);첫번째 매개값은 열거나, 생성하고자 하는 파일의 경로를 Path 객체로 생성해서 지정하면 되고, 두번째 options 매개값은 열기 옵션 값인데 StandardOpenOption의 다음 열거 상수를 나열해주면 된다.
예를 들어 "C:\Temp\file.txt" 파일을 생성하고, 어떤 내용을 쓰고 싶다면 다음과 같이 매개값을 지정하면 된다.
FileChannel fileChannel = FileChannel.open(
    Paths.get("C:\Temp\file.txt"),
    StandardOpenOption.CREATE_NEW,
    StandardOpenOption.WRITE
);
다음은 "C:\Temp\file.txt" 파일을 읽고, 쓸 수 있도록 FileChannel을 생성한다.
FileChannel fileChannel = FileChannel.open(
    Paths.get("C:\Temp\file.txt");
    StandardOpenOption.READ,
    StandardOpenOption.WRITE
);
FileChannel을 더 이상 이용하지 않을 경우에는 다음과 같이 close() 메소드를 호출해서 닫아주어야 한다.
fileChannel.close();
19.4.2 파일 쓰기와 읽기
파일에 바이트를 쓰려면 다음과 같이 FileChannel의 write() 메소드를 호출하면 된다.
매개값으로 ByteBuffer객체를 주면 되는데, 파일에 쓰여지는 바이트는 ByteBuffer의 position부터 limit까지이다.
position이 0이고 limit이 capacity와 동일하다면 ByteBuffer의 모든 바이트가 파일에 쓰여진다.
write() 메소드의 리턴값은 ByteBuffer에서 파일로 쓰여진 바이트 수이다.
int byteCount = fileChannel.write(ByteBuffer src);다음 예제는 FileChannel을 이용해서 문자열을 "C:\Temp\file.txt" 파일에 저장한다.
import java.io.IOException;
import java.nio.ByteBuffer;
import java.nio.CharBuffer;
import java.nio.channels.FileChannel;
import java.nio.charset.Charset;
import java.nio.charset.CharsetEncoder;
import java.nio.file.Files;
import java.nio.file.Path;
import java.nio.file.Paths;
import java.nio.file.StandardOpenOption;

public class FileChannelWriteExample {
	public static void main(String[] args) throws IOException {
		Path path = Paths.get("C:/Temp/file.txt");
		Files.createDirectories(path.getParent());

		FileChannel fileChannel = FileChannel.open(    //FileChannel 생성
			path, StandardOpenOption.CREATE, StandardOpenOption.WRITE);

		String data = "안녕하세요";
		Charset charset = Charset.defaultCharset();
		ByteBuffer byteBuffer = charset.encode(data);

		int byteCount = fileChannel.write(byteBuffer); //데이터 쓰기
		System.out.println("file.txt : " + byteCount + " bytes written");

		fileChannel.close();
	}
}
이번에는 파일 읽기를 살펴보자.
파일로 부터 바이트를 읽기 위해서는 다음과 같이 FileChannel의 read() 메소드를 호출하면 된다.
매개값으로 ByteBuffer 객체를 주면 되는데, 파일에서 읽혀지는 바이트는 ByteBuffer의 position부터 저장된다.
position이 0이면 ByteBuffer의 첫 바이트부터 저장된다.
read() 메소드의 리턴값은 파일에서 ByteBuffer로 읽혀진 바이트 수이다.
한 번 읽을 수 있는 최대 바이트수는 ByteBuffer의 capacity까지이므로 리턴되는 최대값은 capacity가 된다.
더 이상 읽을 바이트가 없다면 read() 메소드는 -1를 리턴한다.
int byteCount = fileChannel.read(ByteBuffer dst);
버퍼에 한 바이트를 저장할 때마다 position이 1씩 증가하게 디는데, read() 메소드가 -1을 리턴할 때까지 버퍼에 저장한 마지막 바이트의 위치는 position-1 인덱스이다.
다음 예제는 이전 예제에서 생성한 "C:\TEmp\file.txt"파일을 읽고 콘솔에 출력한다.
import java.io.IOException;
import java.nio.ByteBuffer;
import java.nio.CharBuffer;
import java.nio.channels.FileChannel;
import java.nio.charset.Charset;
import java.nio.charset.CharsetDecoder;
import java.nio.file.Path;
import java.nio.file.Paths;
import java.nio.file.StandardOpenOption;

public class FileChannelReadExample {
	public static void main(String[] args) throws IOException {
		Path path = Paths.get("C:/Temp/file.txt");

		FileChannel fileChannel = FileChannel.open(
			path, StandardOpenOption.READ);

		ByteBuffer byteBuffer = ByteBuffer.allocate(100);

		Charset charset = Charset.defaultCharset();
		String data = "";
		int byteCount;

		while(true) {
			byteCount = fileChannel.read(byteBuffer);
			if(byteCount == -1) break;
			byteBuffer.flip();
			data += charset.decode(byteBuffer).toString();
			byteBuffer.clear();
		}

		fileChannel.close();

		System.out.println("file.txt : " + data);
	}
}
파일의 크기가 100바이트보다 작지만 8라인에서는 ByteBuffer의 크기를 100으로 주었다.
15라인은 FIleChannel의 read() 메소드를 호출해서 최대 100바이트를 읽는다.
그러나 파일의 크기가 100바이트보다 작으므로 byteCount에는 100보다 작은 값이 저장된다.
17라인에서 flip()을 호출한 이유는 limit을 현재 position으로 설정하기 위해서이다.
18라인은 position에서 limit까지 읽고 문자열로 변환한다.
19라인에서 clear()를 호출한 이유는 position을 0번 인덱스로, limit을 capacity로 설정해서 ByteBuffer를 초기화하기 위해서이다.
19.4.3 파일 복사
파일 복사를 구현하기 위해서는 하나의 ByteBuffer를 사이에 두고, 파일 읽기용FileChannel과 파일 쓰기용 FileChannel이 읽기와 쓰기를 교대로 번갈아 수행하도록 하면 된다.
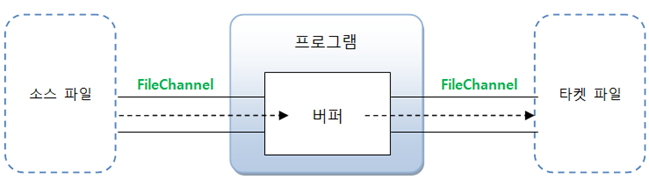
다음 예제는 FileChannel을 이용해서 이미지 파일을 복사한다.
이 예제의 12라인에서는 크기가 100인 다이렉트 버퍼를 생성했다.
채널에서 읽고 다시 채널로 쓰는 경우 다이렉트 버퍼가 좋은 성능을 내기 때문이다.
이클립스에서 예제를 실행할 경우, 생성된 파일이 packageExploer에 보이지 않으므로 F5키를 눌러 프로잭트를 새로고침(refresh)해야 한다.
import java.io.IOException;
import java.nio.ByteBuffer;
import java.nio.channels.FileChannel;
import java.nio.file.Path;
import java.nio.file.Paths;
import java.nio.file.StandardOpenOption;

public class FileCopyExample {
	public static void main(String[] args) throws IOException {
		Path from = Paths.get("src/sec04/exam02_file_copy/house1.jpg");
		Path to = Paths.get("src/sec04/exam02_file_copy/house2.jpg");

		FileChannel fileChannel_from = FileChannel.open(
			from, StandardOpenOption.READ);

		FileChannel fileChannel_to = FileChannel.open(
			to, StandardOpenOption.CREATE, StandardOpenOption.WRITE);

		ByteBuffer buffer = ByteBuffer.allocateDirect(100);
		int byteCount;
		while(true) {
			buffer.clear();
			byteCount = fileChannel_from.read(buffer);
			if(byteCount == -1) break;
			buffer.flip();
			fileChannel_to.write(buffer);
		}

		fileChannel_from.close();
		fileChannel_to.close();
		System.out.println("파일 복사 성공");
	}
}
이번 예제처럼 ByteBuffer와 FIleChannel 2개를 직접 생성해서 복사를 구현해도 좋지만, 단순히 파일ㅇ르 복사할 목적이라면 NIO의 Files클래스의 copy() 메소드를 사용하는 것이 더 편리하다.

• 첫 번째 source 매개값에는 원본 파일의 Path 객체 지정
• 두 번째 target 매개값에는 타겟 파일의 Path 객체 지정
• 세 번째 매개값은 StandardCopyOptoin 열거 상수를 목적에 맞게 나열

다음 예제는 Files클래스의 copy() 메소드를 이용해서 이미지 파일을 복사한다.
import java.io.IOException;
import java.nio.file.Files;
import java.nio.file.Path;
import java.nio.file.Paths;
import java.nio.file.StandardCopyOption;

public class FilesCopyMethodExample {
	public static void main(String[] args) throws IOException {
		Path from = Paths.get("src/sec04/exam02_file_copy/house1.jpg");
		Path to = Paths.get("src/sec04/exam02_file_copy/house2.jpg");

		Files.copy(from, to, StandardCopyOption.REPLACE_EXISTING);
		System.out.println("파일 복사 성공");
	}
}
19.5 파일 비동기 채널
■ FileChannel의 단점
- read()와 write() 메소드는 작업하는 동안 블로킹
• 블로킹 동안에 UI 갱신이나 이벤트 처리를 할 수 없음
• 따라서 별도의 작업 스레드를 생성해서 이들 메소드를 호출해야
• 동시에 처리해야 할 파일 수가 많다면 스레드 수 증가로 문제 유발 가능
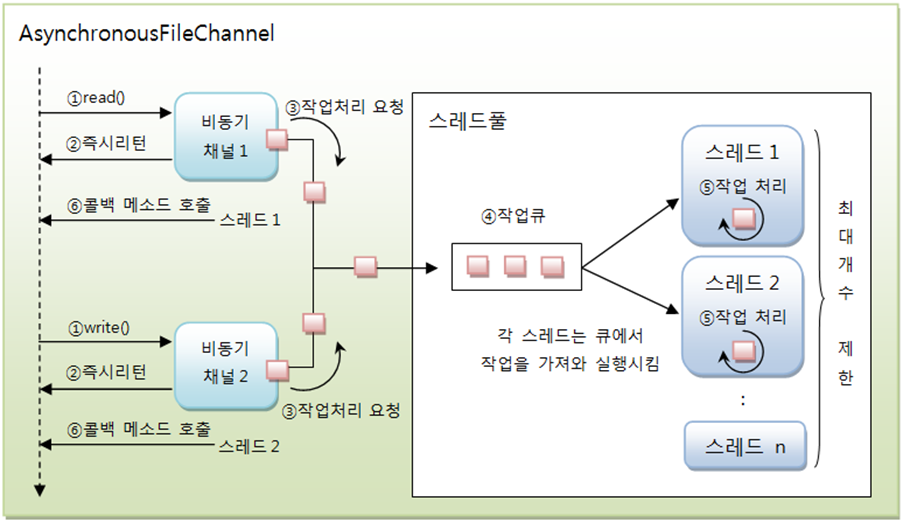
■ AsynchronousFileChannel
- read()와 write() 메소드는 즉시 리턴
• 이들 메소드는 스레드풀에게 작업 처리를 요청하고 즉시 리턴
• 작업 스레드가 파일 입출력 완료 - 콜백(callback) 메소드 자동 호출
불특정 다수의 파일 및 대용량 파일의 입출력 작업 시 유리
AsynchronousFileChannel 생성과 닫기
AsynchronousFileChannel은 두 가지 정적 메소드인 open()을 호출해서 얻을 수 있다.
첫 번째 open() 메소드는 다음과 같이 파일의 Path객체와 열거 옵션을 매개값으로 받는다.
AsynchronousFileChannel fileChannel = .open(
    Path file,
    OpenOption.... options
);
이렇게 생성된 AsynchronousFileChannel은 내부적으로 생성되는 기본 스레드풀을 이용해서 스레드를 관리한다.
기본 스레드풀의 최대 스레드 개수는 개발자가 지정할 수 없기 때문에 다음과 같이 두 번쨰 open() 메소드로 AsynchronousFileChannel을 만들 수도 있다.
AsynchronousFileChannel fileChannel = AsynchronousFileChannel.open(
    Path file,
    set<? extends OpenOption> opens,
    ExecutorService executor,
    FileAttribute<?> ... attrs
);
예를 들어 "C:\Temp\file.txt"파일에 대한 AsynchronousFileChannel은 다음과 같이 생성할 수 있다.
ExecutorService executorService = Executors.newFixedThreadPool(
    Runtime.getRuntime().avaliableProcessors()
);

AsynchronousFileChannel fileChannel = AsynchronousFileChannel.open(
    Paths.get("C:\Temp\file.txt");
    EnumSet.of(StandardOpenOption.CREATE, StandardOpenOption.WRITE),
    executorService
);
Runtime.getRuntime().avaliableProcessors()는 CPU의 코어 수를 리턴한다.
코드코어 CPU는 4, 하이퍼 스레딩일 경우는 8을 리턴한다.
EnumSet.of() 메소드는 매개값으로 나열된 열거 상수를 Set객체에 담아 리턴한다.
AsynchronousFileChannel을 더 이상 사용하지 않을 경우에는 다음과 같이 close() 메소드를 호출해서 닫아준다.
fileChannel.close();
19.5.2 파일 읽기와 쓰기
AsynchronousFileChannel이 생성되었다면 read(), write() 메소드를 이용해서 입출력할 수 있다.
read(ByteBuffer dst, long position, A attachment, CompletionHandler<Integer, A> handler);
write(ByteBuffer src, long position, A attachment, CompletionHandler<Integer, A> handler);
이 메소드들을 호출하면 즉시 리턴되고, 스레드풀의 스레드가 입출력 작업을 진행한다.
dst와 src 매개값은 읽거나 쓰기 위한 ByteBuffer이고, position 매개값은 파일에서 읽을 위치이거나 쓸 위치이다.
파일의 첫번째 위치에 바이트를 쓰고 싶다면 position을 0으로 주면 된다.
attachment 매개값은 콜백 메소드로 전달할 첨부 객체이다.
첨부 객체는 콜백 메소드에서 결과값 외에 추가적인 정보를 얻고자 할 때 사용하는 객체를 말한다.
만약 첨부 객체가 필요 없다면 null을 대입해도 된다.
handler매개값은 CompletionHandler<Integer, A> 구현 객체를 지정한다.
Integer는 입출력 작업의 결과 타입으로, read(), write()가 읽거나 쓴 바이트 수이다.
A는 첨부 객체 타입으로 개발자가 CompletionHandler 구현 객체를 작성할때 임의로 지정이 가능하다.
만약 첨부가 객체가 필요 없다면 A는 Void가 된다.
CompletionHandler<Integer, A> 구현 객체는 비동기 작업이 정상정으로 완료된 경우와 예외 ㅂ라생으로 실패된 경우에 자동 콜백되는 다음 두 가지 메소드를 가지고 있어야 한다.
| 리턴 타입 | 메소드명(매개변수) | 설명 |
| void | completed(Integer result, A attachment) | 작업이 정상적으로 완료된 경우 콜백 |
| void | failed(Throwable exc, A attachment) | 예외 떄문에 작업이 실패된 경우 콜백 |
completed() 메소드의 result 매개값은 작업 결과가 대입 되는데, read(), write() 작업 결과는 읽거나 쓴 바이트 수이다.
attachment 매개값은 read()와 write() 호출 시 제공된 첨부 객체이다.
failed() 메소드의 exe 매개값은 작업 처리 도중 발생한 예외이다.
주목할 점은 콜백 메소드를 실행하는 스레드는 read()와 write()를 호출한 스레드가 아니고 스레드풀의 작업 스레드라는 것이다.
다음은 AsynchronousFileChannel을 이용해서 비동기적으로 "C:\Temp" 디렉토리에 file0.txt ~ file9.txt까지 총 10개의 파일을 생성한 후 "안녕하세요" 라는 내용을 쓴다.
그리고 비동기 작업이 완료되었을 떄 사용된 바이트수와 처리를 담당했던 스레드 이름름을 콘솔에 출력한다.
import java.io.IOException;
import java.nio.ByteBuffer;
import java.nio.channels.AsynchronousFileChannel;
import java.nio.channels.CompletionHandler;
import java.nio.charset.Charset;
import java.nio.file.Files;
import java.nio.file.Path;
import java.nio.file.Paths;
import java.nio.file.StandardOpenOption;
import java.util.EnumSet;
import java.util.concurrent.ExecutorService;
import java.util.concurrent.Executors;

public class AsynchronousFileChannelWriteExample {
	public static void main(String[] args) throws Exception {
		//스레드풀 생성
		ExecutorService executorService = Executors.newFixedThreadPool(
			Runtime.getRuntime().availableProcessors()
		);

		for(int i=0; i<10; i++) {
			Path path = Paths.get("C:/Temp/file" + i + ".txt");
			Files.createDirectories(path.getParent());

			//비동기 파일 채널 생성
			AsynchronousFileChannel fileChannel = AsynchronousFileChannel.open(
				path,
				EnumSet.of(StandardOpenOption.CREATE, StandardOpenOption.WRITE),
				executorService
			);

			Charset charset = Charset.defaultCharset();
			ByteBuffer byteBuffer = charset.encode("안녕하세요");

			//첨부 객체 생성
			class Attachment {
				Path path;
				AsynchronousFileChannel fileChannel;
			}
			Attachment attachment = new Attachment();
			attachment.path = path;
			attachment.fileChannel = fileChannel;

			//CompletionHandler 객체 생성
			CompletionHandler<Integer, Attachment> completionHandler =
				new CompletionHandler<Integer, Attachment>() {
				@Override
				public void completed(Integer result, Attachment attachment) {
					System.out.println(attachment.path.getFileName() + " : " + result + " bytes written : " + Thread.currentThread().getName());
					try { attachment.fileChannel.close(); } catch (IOException e) {}
				}
				@Override
				public void failed(Throwable exc, Attachment attachment) {
					exc.printStackTrace();
					try { attachment.fileChannel.close(); } catch (IOException e) {}
				}
			};

			fileChannel.write(byteBuffer, 0, attachment, completionHandler);
		}

		//스레드풀 종료
		executorService.shutdown();
	}
}
이 예제에서 주의할 점은 48라인에서 write() 메소드가 즉시 리턴되더라도 뒤에서는 작업 스레드가 파일 쓰기 작업ㅇ르 하고 있기 때문에 바로 AsynchronousFileChannel을 닫으면 안된다.
작업이 정상적으로 완료 되었거나, 실패일 경우 채널을 닫아야 하므로 completed() failed() 메소드에서 AsynchronousFileChannel의 close()를 호출해야 한다.
다음 예제는 이전 예제에서 생성한 file0.txt ~ file1.txt를 읽고 콘솔에 출력한다.
import java.io.IOException;
import java.nio.ByteBuffer;
import java.nio.channels.AsynchronousFileChannel;
import java.nio.channels.CompletionHandler;
import java.nio.charset.Charset;
import java.nio.file.Path;
import java.nio.file.Paths;
import java.nio.file.StandardOpenOption;
import java.util.EnumSet;
import java.util.concurrent.ExecutorService;
import java.util.concurrent.Executors;

public class AsynchronousFileChannelReadExample {
	public static void main(String[] args) throws Exception {
		//스레드풀 생성
		ExecutorService executorService = Executors.newFixedThreadPool(
			Runtime.getRuntime().availableProcessors()
		);

		for(int i=0; i<10; i++) {
			Path path = Paths.get("C:/Temp/file" + i + ".txt");

			//비동기 파일 채널 생성
			AsynchronousFileChannel fileChannel = AsynchronousFileChannel.open(
				path,
				EnumSet.of(StandardOpenOption.READ),
				executorService
			);

			ByteBuffer byteBuffer = ByteBuffer.allocate((int)fileChannel.size());

			//첨부 객체 생성
			class Attachment {
				Path path;
				AsynchronousFileChannel fileChannel;
				ByteBuffer byteBuffer;
			}
			Attachment attachment = new Attachment();
			attachment.path = path;
			attachment.fileChannel = fileChannel;
			attachment.byteBuffer = byteBuffer;

			//CompletionHandler 객체 생성
			CompletionHandler<Integer, Attachment> completionHandlernew =
				new CompletionHandler<Integer, Attachment>() {
				@Override
				public void completed(Integer result, Attachment attachment) {
					attachment.byteBuffer.flip();

					Charset charset = Charset.defaultCharset();
					String data = charset.decode(attachment.byteBuffer).toString();

					System.out.println(attachment.path.getFileName() + " : " + data + " : " + Thread.currentThread().getName());
					try { fileChannel.close(); } catch (IOException e) {
						//e.printStackTrace();
					}
				}
				@Override
				public void failed(Throwable exc, Attachment attachment) {
					exc.printStackTrace();
					try { fileChannel.close(); } catch (IOException e) {}
				}
			};

			//파일 읽기
			fileChannel.read(byteBuffer, 0, attachment, completionHandlernew);
		}

		//스레드풀 종료
		//Thread.sleep(1000);
		executorService.shutdown();
	}
}